General
The Timeline widget is a beautiful way to display time related content. It’s also good for any content that suits the timeline pattern, supports posts and has a ton of options.
Why use Timeline?
Extras was the first to bring a timeline widget to Elementor with a very cool way of depicting progress on scroll. The widget is completely customisable, supports multiple content for points (including icons, text, automatic numbering and letters). It’s also responsive, you can align to the left, right or center and supports custom content or any custom post type.
How it works
The widget has two ways of adding content to it. You can select this by going to Content > Source. Select Custom to manually enter your content using a repeater control, or, if you have Elementor Pro installed and activated, select Posts to populate your timeline with your custom query.
Custom Source
Every timeline widget consists of Cards, Dates, Points and Line. All these can be styles separately. The Cards are the actual content items, the Dates are the texts to the opposite side of the cards (in the case of the centered layout), the Points are the actual circles running down the line of the timeline. The Line is the vertical align that is filled up on scroll.
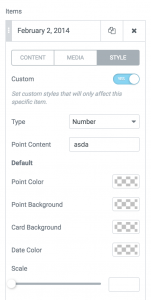
After setting Source to Custom, go to Timeline to manage your timeline items. You can add your WISWYG content as well as select an image to appear before the text content. Under each item you get three tabs: Content, Media and Style. If you need to override any style set under the Content > Style Elementor tab, you can do so by enabling the Custom control from the Style tab of each timeline item.

There are three states for the points along the line.
- Default — The initial state of the point
- Hovered — When you hover the whole card
- Focused — When the progress line passed through the timeline point
All these can be styles under the Elementor Style tab or overridden as mentioned at an item level by going to a specific item, Style tab, and setting Custom to Yes. Once you do that you can modify the content of the point or leave it to Global to abide by the settings you have set for all timeline items.
Posts Source
Note: This is only available if you have Elementor Pro installed and active.
Setting Source to Posts pulls posts from your WordPress site into the timeline. The widget displays the post title, featured image and post excerpt for each item.
You can enable links at a card level through Settings > Enable Links, which means your whole cards will be linked to their respective posts, not just the title and featured image.
The Query section lets you modify what posts you pull in. The controls are the same as the one you see in Elementor Pro in the Posts widget.
You can find additional controls that are self-explanatory under Content > Posts.
FAQ
Can I get rid of the vertical gaps between the cards?
Unfortunately, no. The way the timeline is structured, it would require advanced calculations which hard to accomplish to get rid of the gaps.
Do you have a horizontal timeline for Elementor?
We’re working on it and we’ll definitely release it in the near future.
Can I have different icons for each point?
You can override them under the Style tab of each item. Just set Custom to Yes and choose a different icon. You may need to override the point content type as well, if it’s Global and the global setting is not Icon.
The cards don’t display and the progress doesn’t work
Check the Javascript console. A script might be throwing an error preventing the timeline script from running. If you suspect a certain plugin to be the source of the script throwing the error, disable it and reload the page.
Do the custom cards support custom field values?
Yes. We’ve added Elementor dynamic tags to all content fields.